by Arie Viewer

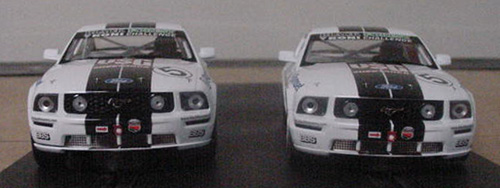
Like most new Scalextric cars, the company’s 2005 Mustang FR500C (C2774 with C2888 coming soon) is a well-made, good-running car right out of the box. The one big knock against it is that the Scalextric designers set the body way too high off the wheels. The result is a car that looks like it was prepared for OFFroad racing rather than road racing. Compared to the Carrera version of the car, (right side below) the Scalextric Mustang’s extra height is embarrassingly evident.

Now, with most cars on the market fixing such a problem would involve not much more than shortening the body posts a bit. Scalextric, however, designed this model with parts of the lower body incorporated into the chassis. That complicates things a little. Even so, if you have a Phillips screwdriver, a hobby saw, an emery board, and a bottle of CA glue you can get your Scalextric Mustang down out of the stratosphere at a cost of less than a dime.
The first step is to remove the body, which attaches to the chassis with four Phillips screws and to the bottom of the interior tub with two. Then strip off the motor, axle assemblies, guide and lead wires, and exhaust tips, leaving a bare chassis. This will involve breaking the circiut boards for the front and rear lights away from their mountings. We were able to do this without damaging anything just by bending them gently back and forth until the glue bonds broke. If the factory worker who assembled your particular car went too heavy on the CA you might end up breaking the prongs on one side of the mount. Don’t worry about that. You will also need to snap the interior tub out of the body.
The first step in modifying the chassis is to use your hobby saw to cut the front end off as shown below. Be careful not to damage the guide tongue.

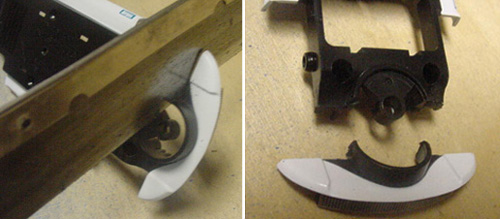
Next, cut off the sides of the chassis right at the inner edge of the white painted area as shown below. This will leave you with three pieces to glue onto the body later as shown in the right-hand picture.

Now it’s time to shorten the four body posts. You’ll need to take 2 mm. off the end of each one. Be sure to measure and mark carefully and cut squarely and on your marks. After cutting, use your emery board to clean up any rough edges.
The bottom of the interior tub also needs some attention. It has on it two screw sockets and two prongs that press down on the rear axle bushings to keep them from popping out. These are marked in the photo below with red arrows. They should be shortened by 2 mm. also. In addition, there are two small pegs identified by blue arrows. These you can cut off entirely. Again, use your emery board to clean up the edges. After that you can snap the interior tub back into the body.

On our car we deleted the working lights since the car was going to be used for racing that didn’t require them. However, you will probably want to retain them. After all, working lights and racing in the dark are kinda cool. So, you’ll need to cut the notches in the chassis that the two circuit boards go into 2 mm. deeper in order to make the light assemblies fit and line up. Your hobby saw will take care of that. You may also need to trim a little of the bottom edges of the two circuit boards. Be careful not to damage any of the printed circuits or wiring. If you broke off any of the mounting prongs in removing the circuit boards, cutting the notches deeper will provide you once again with a secure mounting for the lights.
Now you can put the front and rear axle assemblies back into the chassis and test-fit the body. if you’ve done everything right the tires should be snugged up into the wheel openings but not rubbing on anything. If some or all of the body posts are still a bit long you can take a little off the ends with the emery board. If you cut one too short you can CA glue one or more thin 3/32″ axle spacers to the end to restore a little length.
When you have the body sitting just rght on the chassis, test-fit the front lower portion of the body, which you cut off the chassis earlier, Trim down the front half of the circular shroud around the guide, which stayed with the lower front body, so it’s even with the part of it that remained on the chassis. This is necessary so you can remove and replace the guide’s circular braid plate.
Now you can put the motor, guide, wiring harness, and lights back in and reinstall the body on the chassis. Track test the car to make sure everything is working right and turning freely. Finally, CA glue the three lower body parts to the body (not to the chassis and definitely not both) and the two exhaust tips back onto the chassis. The result is a Mustang with the low, mean stance of a proper bad-boy road racing car. Here’s how the change looks from the side…

And from the front.

We have to wonder why the Scalextric designers didn’t do the car like this to begin with.
Somewhere along the way we also increased the car’s Magnet Marshal reading from just over 200 grams of downforce to 270. We’re not quite sure how we did that, since the height of the magnet above the track remains the same, but we’ll take it. Your results may vary. The lower center of gravity also helps cornering and lap times. And best of all, this cost us less than ten cents for an emery board and a few drops of CA glue. Can’t beat it with a stick.
If you have any questions or comments about this article, please contact us at support@www.electricdreams.com.


