Article and photos by Arie Viewer

The Fly Classic cars have been around a long time. There’s hardly anyone who has been involved in racing or collecting 1/32 scale slot cars over the last few years who doesn’t own at least one of them. They have been one of the most popular series of model racing cars for home and club racers, and we have received many inquiries from customers asking about upgrades for these cars. Most of these have to do with giving the Fly Classics more grip and making them easier and more consistent to drive on plastic tracks.
The Classics were all designed fairly early in Fly’s history, so they have the B21 neodymium disc magnet that was standard on many of the company’s early efforts. They also have Fly’s excellent motor and rear axle pod, which was used on Fly’s Joest, Porsche GT1, and GT1 Evo as well as the Classics. The disc magnet is quite strong but has the drawback of occupying only a small portion of the car’s width. This means that the car is really stuck down as long as its driver keeps it pointed straight but loses grip abruptly, and often catastrophically, when the tail begins to slide in a turn and the magnet is no longer over the steel strips on the track. This makes these cars hard to drive at the limit, as the range of useful cornering attitudes is quite small. Other manufacturers, notably Scalextric, use a long neodymium bar magnet, which provides downforce over much more of the car’s width. That makes their cars easier, more consistent, more realistic, and more forgiving to drive.

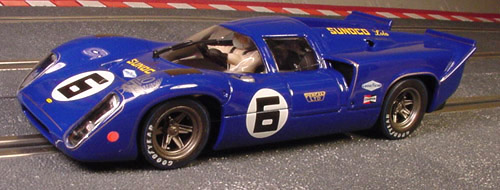
Our project for this week is to adapt the Fly pod to accept a Scalextric bar magnet, adding both grip and drivability to our project car, a Fly A2007 10th Anniversary Lola T70 coupe, modeled after Penske Racing’s 1969 Daytona endurance race winner. For this project you will need a Phillips screwdriver, a Dremel Moto-tool or any of its equivalents from other manufacturers, a hobby knife, and some tape (almost any kind will do). The magnet we will be installing is the Scalextric W8475-2. This is the standard equipment Scalextric bar magnet, so you may already have one or more of them in your parts box or on a junk Scalextric car. There are stronger magnets of the same size and shape, but with a stock motor and power supply the standard Scalextric magnet will give you all the downforce you can actually use, more in some cases. We’re also going to add even more grip with a pair of Indy Grips IG3003 silicone tires or, if you prefer, the equivalent tires from Maxxtrac or Ortmann.

Start by removing the four body mounting screws and taking the body off the chassis. Next, snap the rear axle assembly and motor out of the chassis. Then remove the screw at the rear of the pod and lift the pod off the chassis. You can leave the lead wires attached to the guide. Remove the disc magnet from the pod. It should just fall out by itself.
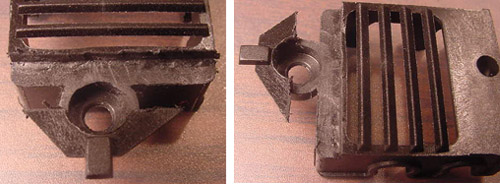
With everything removed from the pod, use your Moto-tool to cut a groove, 8 mm wide and 3 mm deep, in the bottom of the pod as shown below. Use your hobby knife to clean up any rough edges.

The magnet is 2.5 mm thick, and the extra half millimeter will allow you to place shims (for our project just layers of tape) above or below the magnet to move it up or down. This will let you adjust the amount of magnetic downforce to meet limits in the racing rules, equalize your car with another, or give you increased grip in the corners without excessive magnet drag on the straights. Some experimentation will yield the best balance. With the Scalextric magnet all the way down against the top surface of the chassis our Lola actually had more magnet drag than the stock motor could handle, and the car was slow on the straights. Shimming the magnet up a bit freed the car up on the straights while still delivering lots of grip in the corners. Be sure you use enough shims so that when the pod is screwed down in place it holds the magnet tightly in its proper position. If you want to leave the pod slightly loose you may want to anchor the magnet into the pod with a drop of CA glue. Be sure the magnet is centered in the chassis, not on the pod. The pod is offset slightly to the right because the spur gear goes to the left of it and the pod plus the gear as a unit need to be centered. The socket for the old disc magnet is on the car’s centerline, so use it as a guide for positioning the magnet.
.jpg)
Now you can reassemble the chassis. While you have the body off remove the rear tires from the wheels and replace them with the silicones. When installing tires of any kind they slip onto the wheels more easily if you wet the wheels with soapy water (and if you don’t have soapy water available your own saliva works pretty well, too.) Lubricate the motor and axle bushings and check to see that all the moving parts are turning freely. You can also remove the spare tire from the body. It’s a complete front wheel and tire and actually represents a significant amount of weight located where you don’t want it, high and aft of the rear axle. Removing it will marginally improve the car’s weight distribution and center of gravity. Finally, remount the body on the chassis. Don’t forget the screen that fits into the chassis just aft of the radiator opening.

If you are doing this magnet upgrade to a collection of Fly Classics that includes the various cars in the series you will find that some start with the magnet closer to the track than others. You will also find that individual magnets vary in strength. You can put the stronger magnets in the cars with the higher magnet locations and then shim the magnets by varying amounts as needed to get all the cars equal in downforce. The objective is not to get them all as totally stuck down as possible but to find a set of driving characteristics you like and match all the cars to it. The result will be a group of cars that perform better and are more fun to drive.
Oh, and one other thing…
If you don’t like that ugly 10th anniversary logo on the front fender, just put a little fine polishing compound on a damp Q-tip and carefully rub the offending logo with it. In a short time you can take it off without damaging the finish underneath or the pinstriping around it. If the area comes out a little dull just apply some wax to restore the high gloss.


Thankyou…..i like to work on my cars….try to get more performance ,greeting from Virginia