Fixing some of the same mistakes on Monogram’s McLaren M6 that we fixed on their Lola T70
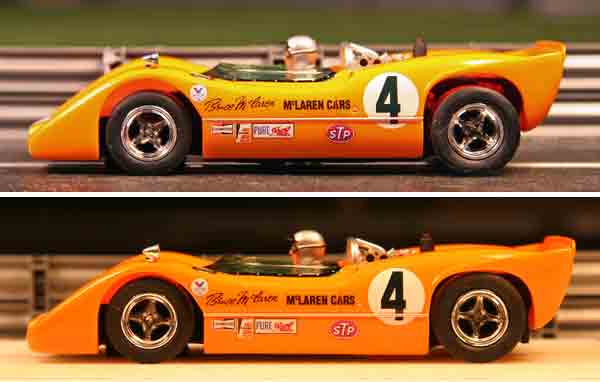
Where have we seen a photo like this before? Oh, I remember…
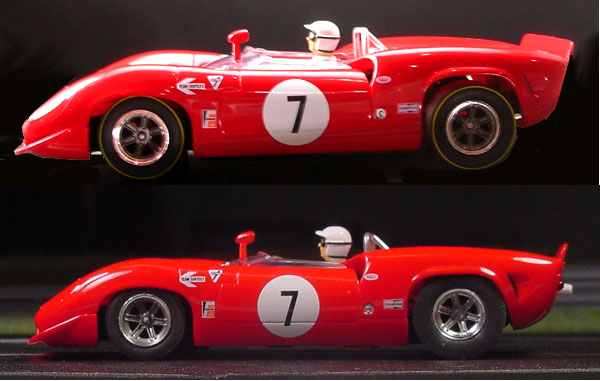
It was this one, in our article about fixing the designers’ mistakes on the Monogram Lola T70.
There is probably a good and sufficient reason why they jacked up the McLaren’s body into the stratosphere the same way they did with the Lola’s. it may have something to do with having produced thousands of motors with those pesky European government-mandated electronic bits soldered to the top of the motor and needing to use them up. We said in the Lola article we couldn’t see why they had to put them on top of the motor where there simply wasn’t room for them under the low contours of a CanAm car body, and we can’t possibly be the only ones who pointed this out. Then again, we only published it in our newsletter, on our web site, and on Slot Car Illustrated. (Actually, if memory serves, somebody else put it on SCI before we thought to do it.) Perhaps we should try to add the design departments of all the slot car manufacturers to our newsletter mailing list.

Don’t get us wrong. The McLaren is a step forward from the Lola in several areas. They fixed the problem with the spur gear dragging on the track by going to a sidewinder chassis layout, which allows a smaller-diameter driven gear. This also lets them use smaller-diameter rear tires of equal width to the Lola’s under a narrower body. The McLaren M6 was actually a smaller car than it looks like in photos and you don’t really appreciate that until you see one parked alongside any of a number of its contemporaries. Monogram did a good job capturing the lines and proportions of the body, much better than on the Lola, which looks too fat in a few places where it should be a little more svelte. The principal drawback to the anglewinder arrangement is that it puts part of the motor where the traction magnet really should be, forcing the whole magnet installation too far forward. Wood track and copper tape devotees, many of whom are ED customers, will not be affected at all, but for others the magnet arrangement may be problematic.
So, our two goals for the M6 are to lower the body and to get some kind of useful magnet farther aft. On the Lola we started by removing all the interference suppressors from the top of the motor. This time we didn’t feel like doing that so we just replaced the motor. We happened to have a brand-new Pioneer 21,000 rpm FC130 motor floating around our workshop (and soon to be available on our web site). It’s a perfect snap-in replacement for the Monogram FC130 except for one thing. It’s a double-ender, with the shaft coming out both ends. We therefore had to cut it off at the endbell end so it would fit inside the body. We used a Moto-tool with a carbide disc to do the job. The Monogram anglewinder pinion gear easily comes off the original motor and installs on the Pioneer one.
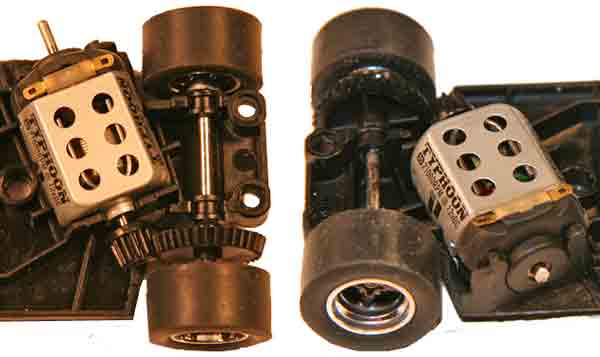
Next, we stripped the chassis down to its bare essentials. We removed everything – motor, axle assemblies, guide, and magnet assembly. Then we sanded the bottom 2/3 of the chassis completely smooth, removing the raised ring around the hole for the key that fastens the car in place inside its case.
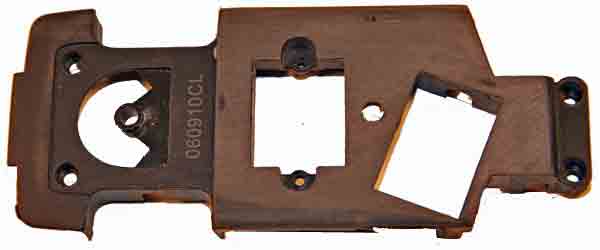
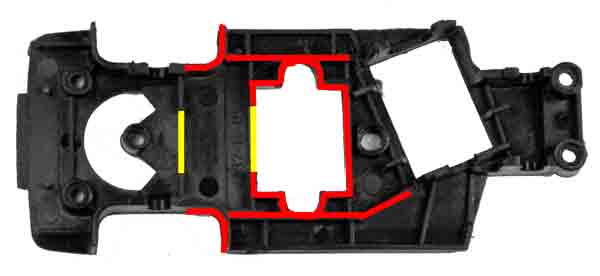
With the bottom of the chassis done we turned it over and began grinding away material from the top. We removed 3/32″ of material from the areas highlighted in red below. The areas in yellow were cut down to the level of the chassis plate to give ample room for the lead wires.
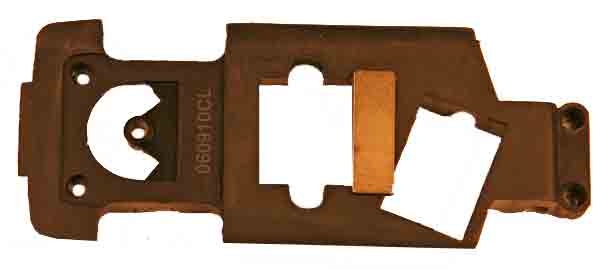
We mentioned above that one of the problems caused by the adoption of an anglewinder layout was that the entire magnet installation was moved too far forward. Compounding the problem is the magnet itself. It doesn’t provide downforce over enough of the car’s width. The fix for all this is shown in the photo below. We CA glued a Professor Motor PMTR1030 1mm thick bar magnet in place as far aft as possible. The 1mm magnet is strong enough to give adequate downforce and thin enough to allow proper clearance under the car. On our Scalextric Sport test track it delivered good cornering grip without sticking the car down so much it bogged on the straights or didn’t need to be driven through the corners. We can still drive the car tail-out but the bar magnet covers enough of the car’s width that we don’t lose magnetic grip at normal cornering angles. The result is like a non-magnet car with higher limits. The earlier step of sanding the bottom of the chassis smooth, removing the ring around the hole for the hold-down key makes this installation possible. Before gluing on the magnet be sure to sand the face if the magnet to be glued to provide some “tooth” for the CA glue to adhere to.
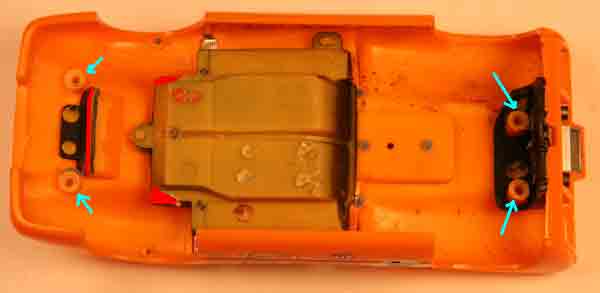
With the chassis done the next step was to do a little carving on the body. That consisted of removing 3/32″ from each of the 4 body mounting posts (blue arrows) and also from the areas highlighted in red below.
With the body done it was time to reassemble the car. All the mechanical components snap back into place. We had to put some lead wires on the Pioneer motor. Any of the various brands of silicone-insulated lead wire and brass end connectors will do the trick. If you find that you don’t get a good tight fit between the lead wire connectors and the guide you can double over the ends of the braid to tighten things up. You can also replace the stock guide with an aftermarket one from Slot It, NSR, or another manufacturer of your choice if you wish. When you put the body on be sure the lead wires pass through the two areas that were cut down to the chassis plate. This is to keep them from being pinched between the chassis and the interior tub. One caution: the two front body mounting screws need to be shortened because of the reduced length of the front mounting posts. If they are left at stock length they will try to poke through the surface of the body when tightened down.
Before track testing we sanded the rear tires to make sure they were making full contact with the track surface for best traction. With that done we broke in the motor a bit and then explored the modified car’s performance capabilities. The Pioneer motor is very quick on the straights and the new magnet installation gives good but not excessive grip, making the car fast and fun to drive. There is plenty of scope for tuning the car further to equalize it with other cars or to obtain a desired performance level. And, of course, we now have a car that sits down low over the wheels like a proper McLaren M6A should.

Here’s our modified M6 next to our modified T70. Perhaps the third try will be the charm for Monogram and their next CanAm car won’t need modifying.

And here, just for fun, is a shot showing the relative sizes of the M6, the T70, and a Carrera M20. This shows what a compact car the M6 really is.


