
In the time since the first Pioneer Mustang race car was released we have been totally impressed by the quality and performance of Pioneer’s cars. Being the incorrigible kitbashers we are, we no sooner got our hands on a Pioneer Mustang than we had the body off of it and were test-fitting the chassis to all kinds of bodies to see what would fit. When we saw that the old Revell snap Javelin was almost a perfect fit for the Mustang chassis we just had to do the conversion. This is a joint effort of the ED tech department and our friends at Pioneer Models, who provided the complete running chassis and other components plus a copy of a soon-to-be-released decal sheet. We’ve been saying for quite a while that the Pioneer cars are great kitbash platforms, and this project is just the beginning of an ongoing effort to explore the possibilities.
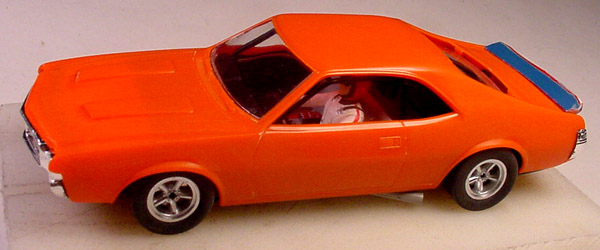
One of the neat things about the 60s pony cars is that they all had about the same wheelbase and proportions. Thus, a chassis for any one of them should be a good fit for the bodies of most or all of them. Once we got into our Javelin project we discovered that not only the chassis but also the complete Mustang racing interior is perfect for kitbashing classic TransAm cars. The same chassis is used on all the Pioneer Mustangs. The particular one we used came from a Bullitt, and we added a pair of exhausts from a junk Scalextric 69 Camaro. If you use a chassis from any of the Pioneer Mustang race cars it comes with side exhausts already on it. The interior assembly came from a fastback race car.
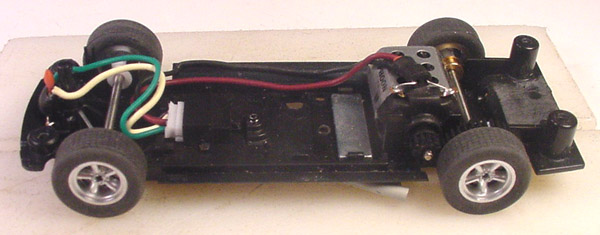
The Mustang chassis itself fits the Javelin body without any modifications. The only thing we had to do to make the Javelin body fit was to use Pioneer Mustang race car front wheels and tires on all 4 corners. The Revell body was not quite wide enough through the rear fenders to fit over the slightly wider race car rears. Indy Grips 1009 and 1016silicone tires will fit the Pioneer front wheels (the same size that’s used on all 4 corners of the Bullitt but without the road car center caps). If you don’t mind flaring the rear fenders a bit you can use the wider race car rears. That would allow you to use the complete running chassis from a Pioneer notchback or fastback Mustang race car with no changes of any kind.
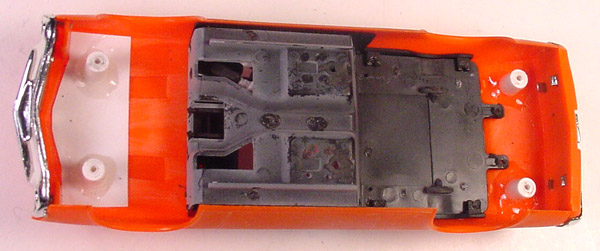
Here you can see the body posts we made by laminating 3 sizes of Evergreen styrene tubing, as we have described in previous kitbash articles. We CA glued a piece of sheet styrene into the underside of the body at the front to provide a completely flat area to attach the body posts to. The posts are glued in with medium CA and then reinforced with 5-minute epoxy. All we had to do to the interior assembly to make it a near-perfect fit to the Javelin body was just a little filing on the very front upper edge, removal of the two screw sockets on the bottom (one in the center of each of the rectangular areas) and removal of two mounting tabs at the front edge of the interior, like the two extending from the rear edge in the photo above.
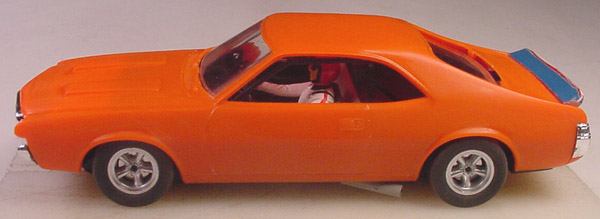
With the body, interior, and chassis assembled, you almost couldn’t ask for a better fit among the components. The interior looks like it was made for the body. The angle of the bars at the front of the roll cage even matches the angle of the windshield. The rear spoiler, like the exhausts, was salvaged from a Scalextric 69 Camaro.
This project rapidly shaped up to be the easiest kitbash we have ever done. In almost no time we were ready to begin painting the car. We primed it in light grey and then applied three light coats of gloss white. The photo below shows the car after the first coat of white.
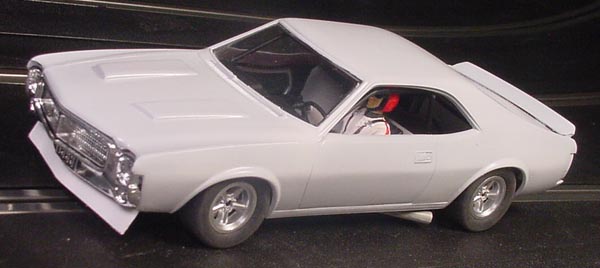
You can see also from this shot the front air dam we made for the car from sheet styrene.
We decided to put an American Motors red, white, and blue scheme on the car. After the final coat of white was completely dry we wet sanded the body with 600-grit paper to remove any imperfections in the white paint. Then we masked off a vertical stripe just forward of the rear wheel openings. For the masking we used 3M blue masking tape, which has worked very well for us on previous projects. Here’s how it looked at that point:
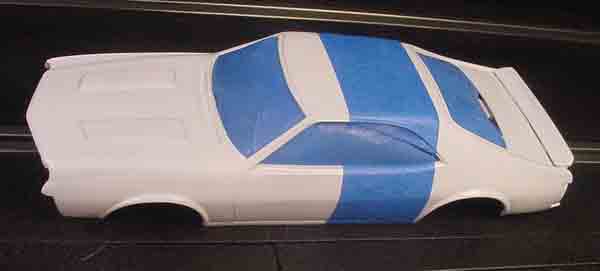
You can see in this photo that we also masked off the window openings from the inside to prevent overspray from getting onto parts of the inside of the body that will be visible on the finished car. After additional masking to cover the front part of the car we painted the rear portion with Testor Model Master 52709 Boyd Red (from the “Boyd Coddington” paint line. With the red paint done the body looked like this:
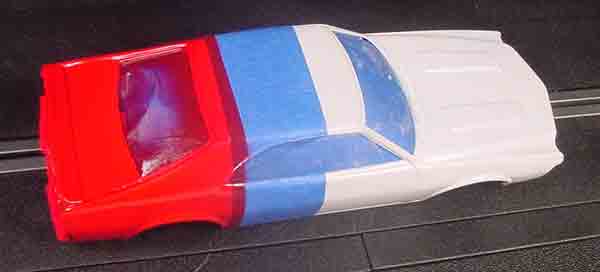
Boyd Red, by the way, is a very attractive color, and it’s the one we use whenever we want a rich shade of red. It looks great on a Ferrari, too.
After letting the red paint dry thoroughly we masked off the rear of the car and sprayed the front with Model Master 2715 French Blue. With the three main colors completed and the first of the decals applied, the car looked like this:
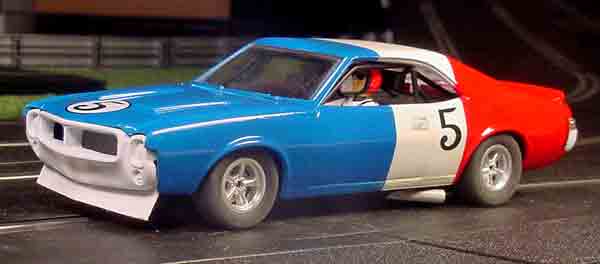
You can see that the nose cap was still in white primer in this shot. The goal was to create a car that is not a model of a 68-69 factory Javelin but one very much in keeping with the period look of AMC race cars from the late 60s. Notice how the Pioneer driver’s red helmet and white uniform go perfectly with the car’s body colors.
After more decals, detail painting, clear coating, and final assembly it looked like this.

We completed the decals using more sponsor logos plus the SCCA wheel and TransAm series decals from the Pioneer decal sheet to be included with the soon-to-be-released Mustang kits. The exception was the Budweiser decals on the rear fenders, which came from an old decal sheet we had lying around. This car could easily be a model of a 1970s SCCA club racing car and occasional TransAm entry sponsored by a beer distributor with some help from a local AMC dealer. Note that we painted a sunshade onto the top of the windshield and simplified the front air dam slightly.
The project has turned out to be every bit as easy as we thought it would be. It required no modification to the chassis of any kind. The only modification to the running gear was to fit the Pioneer TransAm car front wheels and tires, a bit narrower than the TA rears, to fit inside the Javelin rear fenders. A little minor fender flaring would have enabled us to use the complete running chassis from either a notchback or fastback Mustang race car, including the wider rears, but we wanted to keep this project as simple as possible so we avoided bodywork this time around. The Mustang interior fits the Javelin body with only very minor trimming, as described before. This is a project that even a first-time kitbasher can tackle with confidence.
We have it on good authority that Pioneer is working on making a complete TA Mustang running chassis, without body, available for hobbyists who want to do projects like this at the lowest possible cost. We also have been told that a complete selection of spare parts, including wheels, tires, gears, motors, and detail parts, is in the pipeline and should appear soon. Pioneer is aware of the potential uses of its spare parts that go well beyond just repairing the cars it makes and will be planning its spare parts offering with them in mind.
The body used in this article turns up fairly often on eBay and a resin clone of it is also available. For more information about this, contact us at support@electricdreams.com.
And just to give you another idea…

How about a late-70s Camaro? (A version of this kit is currently available from Revell-Monogram for just a few bucks.)
If you have any questions or comments on this article, please leave them below.


Great idea guys, Did you try any of David Reinharts RMS resin bodies on the chassis yet?
all the best as always
Allan Wakefield
Have you put a Carrera Mustang GT body on a Pioneer chassis? I have one and it’s top heavy. Wish I never bought it. A beautiful car but it has a bad rake to it like a drag car. It rolls over on a road course.