Virtually every 1:32 scale RTR slot car made today comes with press-on plastic wheels. We’ll acknowledge it right at the start – they are not, technologically speaking, the greatest slot car wheels ever made. We’re well aware that a fair number of hobbyists would prefer to buy cars that come with machined aluminum wheels held on with set screws. For a number of reasons, primarily cost, that’s not going to happen anytime soon except in a few specialized cases. The truth, however, is that for most home track racers plastic wheels are capable of delivering all the performance that’s really needed, and nobody can deny that many of the plastic wheels currently being offered look highly realistic. Here are some tips that will help you get the most out of the plastic wheels and slip-on tires on your fleet of cars.
One of the most common complaints about RTR car wheels and tires is that they are not adequately true and concentric. This certainly does happen, but out-of-round wheels bad enough to impair the performance of the car and beyond correction with fairly simple procedures are not nearly as common as a relatively small faction within the hobby would like you to believe.
Plastic wheels are held onto the car’s axles by what is known as an “interference fit”. The diameter of the hole in the center of the wheel is ever so slightly smaller than that of the axle. When pressed on for the first time the wheel usually fits very tightly, so tightly in some cases that it can be hard to exert enough force on it to get it back off again. This is especially true when the axle ends are knurled or splined to grip the wheels more tightly. Not only that, but if the wheel isn’t pressed on completely straight at the factory the force can distort the hole causing the wheel to go on crooked. It doesn’t have to be off very far to cause wheel hop or tire rubbing on the body or chassis, or even a visible wobble in the wheel as it turns.
Of course, not every out-of-round condition is caused by crooked wheels. There is a tire involved, too, and it’s made of a molded rubber or silicone material that is far more prone to distortion than the hard plastic wheel is. In addition, it’s easy for the tire to be improperly seated on the wheel during assembly. So, when problems arise the first thing you need to do is make sure the tire is seated properly. Almost every plastic wheel has a rib running around its circumference, as shown in Drawing 1. A corresponding groove in the inside of the tire locates and retains the tire on the wheel. The tires on RTR cars are not glued or otherwise bonded to the rim. The rib and groove do all the work of keeping the tire firmly in place. The tire stretches enough to allow it to be slipped on and off over the rib. It’s easy for the tire to get hung up on the rib and not fit snugly all around the wheel. To seat the tire, press firmly on the tread surface at the point where the tire is not seated properly. It may be necessary to remove the tire and remount it to get it fully seated.
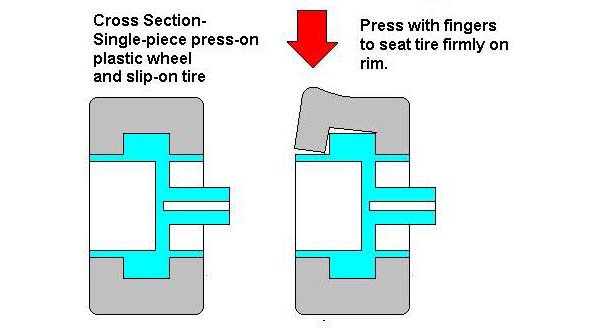
When mounting slip-on tires you can get them to go into their correct position on the wheel more easily and with less stretching and strain on the tire by first coating the wheel with liquid dishwashing or hand soap. This, by the way, is especially important with some older-formula silicone tires, which can tear easily if subjected to too much stretching during the mounting process. It can allow you in some cases to use tires that otherwise could not be made to fit on the wheels. This can be very handy for those who may wish to use tires with a larger or smaller diameter than the ones made specifically for the wheels they are using.
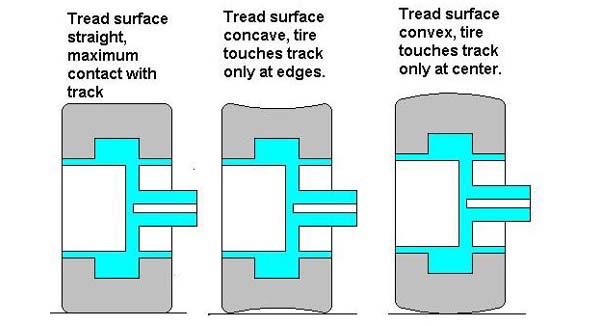
Once the tire is properly seated on the rim it may still be out of round or out of true. In addition the tread surface may be concave or convex, as shown in drawing 2. As a result only a small portion of the tire’s possible contact patch (the portion of the tire’s tread surface touching the track at any given time) may be actually touching the track. Since traction is a function of the size of the contact patch you want the tire making contact uniformly across its entire width.
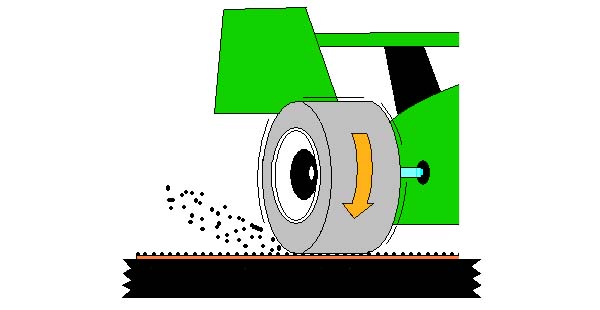
To achieve this most desirable condition the tire will have to be trued. The most common and quickest way of doing this is shown in Drawing 3. Tape some medium-fine sandpaper to the track and hold the car in place with the rear tires on the abrasive surface of the sandpaper. Give the car some throttle and spin the tires against the sandpaper. Take care not to bog down the motor or cause it to overheat. When truing treaded tires, be sure you take into account any rules where you race that require a certain minimum amount of the tread pattern to remain on the tire. Where rules allow it you can sand tires down even farther to lower the entire car and with it, the traction magnet for increased magnetic downforce.
Unless the tires are badly out of their proper shape you can also true them over time by simply driving the car. As you put laps on the car and break in all of its moving parts the tires will also wear down to proper trueness.
Keep in mind when removing and replacing slip-on tires that the tampo-stamped sidewall lettering and other detail is often fragile. The paint used does not always bond well to the tire rubber and the pressure of your fingers can rub it off in ordinary handling. Be especially careful with the tires on any car you hope to keep as a collectible. The value goes way down if the sidewall markings (along with everything else) are less than perfect. If you plan to run the car but later want it to look pristine for display or sale you will want to buy a set of original replacement tires with perfect sidewall markings and store them in a plastic bag for installation when that time comes.
Believe it or not, a common question from newcomers to the hobby is, “How do I get the wheels off?” What most of them are really asking is, “How do I get the wheels off without breaking them?” To the complete newcomer to the hobby it’s not obvious how the wheels are held on since there are no fasteners, such as set screws. It’s also not clear how much force can be applied to the wheels without breaking them.
You can remove press-on wheels with a combination of pulling and twisting force as shown in Drawing 4. With both wheels on the axle you can apply the force by gripping one wheel with each hand. On some cars this is easier to do if you snap the axle assembly out of the chassis. Be sure to pull the wheel perfectly straight back off the axle without applying any sideways bending force that can crack the hub. As long as you are careful about this, unless you are Iron Man you won’t be able to apply enough force to break anything.

Once you get the first wheel off the axle you have the problem of how to grip the axle tightly enough to twist off the other wheel. Ordinary pliers often won’t work for this purpose and you end up damaging the axle. The solution is to use locking pliers, such as Vise-Grips. It’s worth noting, by the way, that the axles used in many RTR cars are made of a fairly soft material that can be damaged easily. They usually aren’t the nearly indestructible drill blanks sold as aftermarket axles.
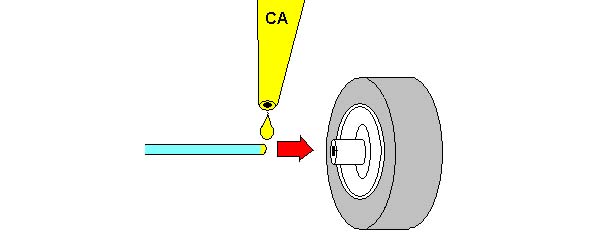
To put the wheels back onto the axles, just press them straight on using your fingers, again being careful not to apply any sideways force that can crack the hub. Some racers help insure that the wheels will press all the way onto the axles by drilling a tiny hole all the way through the exact center of each wheel. This prevents air being trapped between the wheel center and the end of the axle. In most cases, once you take plastic wheels off the first time they are never as tight again and they will go on and off much more easily. In fact, every time you take a plastic wheel off and put it back on again it gets a little looser. Not only that, but even wheels that have never been removed from the axle can gradually work loose due to the ordinary stresses placed on them in normal operation. As a result, virtually every press-on plastic wheel eventually becomes too loose to stay on the axle. Fortunately, the solution is simple. Just put a small drop of medium-thick CA glue on the axle end, as shown in Drawing 5, and press the wheel on. Give the glue a few minutes to set fully and the wheel fits as tight as a brand-new one. You will still be able to get the wheel off again if you need to.
Of course, sometimes, no matter how careful you are, you do crack a wheel hub. Don’t worry. The wheel can be made as good as new ‚Äö√Ñ√∂‚àö√ë‚àö‚àÇ‚Äö√†√∂‚àö√´‚Äö√†√∂¬¨¬Æ better, even. All you have to do is coat the outside of the hub with CA glue and slide on a length of styrene or brass tubing, as shown in Drawing 6. The CA seals up the crack and the tubing not only binds up the hub so the cracked piece is forced back into its correct position but also adds enough strength to the hub that cracking will never again be a problem unless the wheel is subjected to catastrophic force. You can do this to brand-new, undamaged wheels as a preventive measure, too. Some Fly car wheels have at times been especially susceptible to hub cracking. Evergreen #227 tubing is the size that fits Fly hubs and those of many other plastic wheels as well. If you prefer brass tubing you can get it in various diameters from any hobby shop that has a K&S metals rack.

Once in a while you encounter a wheel that simply will not come off the axle no matter what you do with it. This is not uncommon with Carrera cars, since Carrera uses truly extreme knurling on its axle ends to grip the plastic wheels ferociously. If all else fails you can violate everything we just told you above and bend the wheel sideways just enough to crack the hub. Then, use the CA and tubing trick to fix the hub before reinstalling the wheel. Don’t do this except as a last resort.
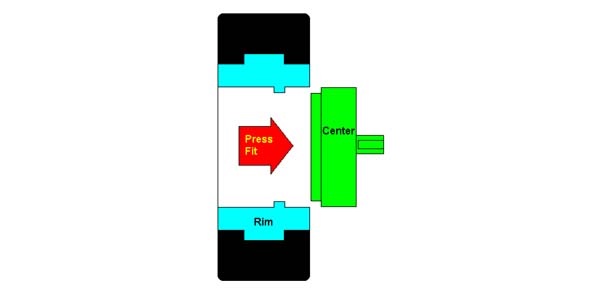
Some press-on wheels are actually two-piece assemblies in which the rim is a press-fit onto the center, as shown in Drawing 7. This is done to allow the center and the rim to be painted or plated differently, giving the wheel a more realistic look. Like the wheel hub on the axle, the rim can work loose from the center over time, and sometimes they are not a perfectly tight fit right from the factory. You will find that out when you try to twist off a two-piece wheel as described above and the rim, with the tire on it, comes off in your hand while the center remains firmly attached to the axle. The fix is the same – a little CA on the mating surfaces and the rim pressed back onto the center. Be careful with the CA, as it can ruin the wheel’s paint or plating if it gets onto the wrong place.
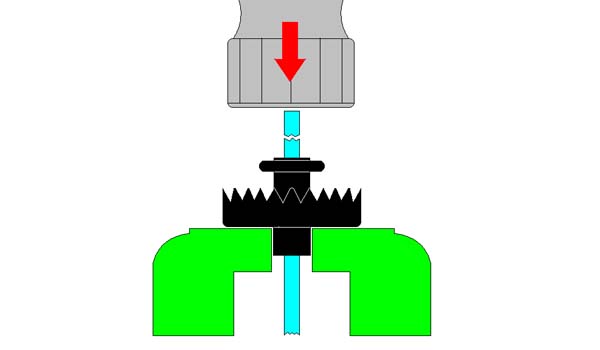
While we’re at it we should say a few words about press-on plastic gears. The gears typically fit the axle more tightly than the wheels do and some car makers spline the axle at the point where the gear goes to grip it more tightly. You usually won’t get a gear off by twisting it with your fingers because you can’t grip it hard enough to apply the necessary force. To remove a press-on gear, take the wheels and bushings off the axle. Place the axle in a bench vise as shown in Drawing 8. Use a hammer to drive the axle through the gear. Use a piece of steel wire or a drill blank slightly smaller than the axle to drive it all the way through. Use the same procedure to drive the axle back into the gear. Be sure to drive the axle in straight to avoid damaging the hole in the gear, and keep in mind that RTR car axles can be bent.
With all this knowledge you are now equipped to get years of reliable performance out of your cars’ press-on wheels and gears and slip-on tires. For the needs of most hobbyists these techniques will make upgrades to more expensive aluminum set-screw wheels and gears unnecessary. Have fun!
Copyright 1998, revised edition copyright 2009, Robert M. Ward. Used by permission.
If you have a question or comment on this article please send it to support@electricdreams.com.


Nice and informative. Being a machinist I took the time to do a little machine work on a dallera car. I machined the knurl on the axles to fit bushings that I had made also. Then I used a soft jaw set up to machine the hub (epoxy filled) to the axle. All in all, a lot of work, and the performance increase was not any better than the factory IMHO. Scaley cars and others run great out of the box. A sanding block to true the tires is really all that is needed. Just follow the article and all will be ok. Thanx: Mike